How to Complete Wavlink AX3000 Outdoor Setup?
The Wavlink outdoor extender with the AX3000 WiFi abilities can connect with your home network and provide outdoor connectivity. It is easy to connect and install without using any cables. Here, we will provide you instructions to set AX3000 outdoor extender up in minutes.
At first, we will walk you through the physical installation, then WPS connect as well as interface wireless connection. Not only setup is enough, we will provide you with major and impactful troubleshooting tips and solutions to deal with the setup errors if you face any.
Wavlink AX3000 Setup (Outdoor Extender)
You can mount as well as hang the AX3000 range extender in your house or outside of your house.
Before starting the setup, you must decide at which mode you want your extender should work. There are three modes in it: AP mode, repeater mode, router mode.
In this page, we will provide steps to install your device into the repeater mode wirelessly.
Via WPS
There is a Pair button on the device which you can use to connect the outdoor extender with the existing WiFi inside your home. Follow these instructions:
- Press and hold the RESET/PAIR button for 2 seconds on the extender.
- Press the WPS button on the existing WiFi for once.
- Wait until the connection is complete and extender’s LED turns solid on.
- Then you can use it as a repeater and connect the new network through the existing router’s SSID credentials.
Via Wavlink Login Interface
Wavlink WiFi extender also provides interface window which you can use to connect the existing home network wirelessly. Just follow step-by-step procedure to access the Wavlink AX3000 login interface and configure the extender.
- At first, power up the range extender close by or inside the reach of the WiFi router.
- Then, connect a computer with the extender default SSID network.
- Open the web browser and visit the wavlogin.com or ap.setup or 192.168.10.1.
- Enter the default admin login password: admin.
- Click LOGIN button, then select the host router network and enter its password to connect both devices.
- On the next page, choose which mode you want your outdoor extender will work, just select repeater.
- Click NEXT button, and enter the extender’s SSID username and password to create the new WiFi network.
- Click Finish and wait until the process bar reaches to 100%. After that, click REBOOT button.
Now, your Wavlink AX3000 setup is completed and you can connect with your extended network easily.
You should also learn how to make changes into the Wavlink extender settings to prevent any hack and better your WiFi security.
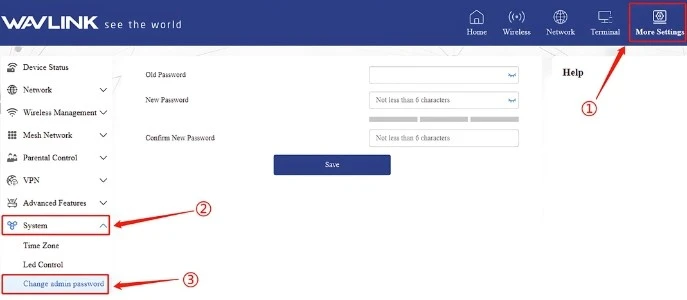
A Change Admin Password
Access the Wavlink AX3000 outdoor setup page on your computer and go into the Administration Settings. Enter the new admin password and SAVE it to apply.
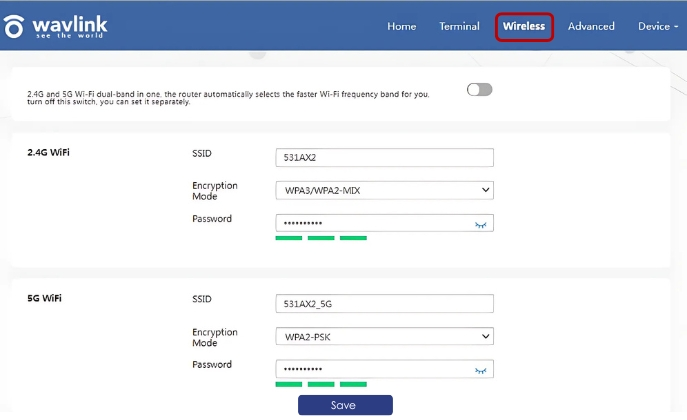
B Change WiFi Password
Log into the Wavlink extender interface with the help of the IP 192.168.10.1 > go into the Wireless Settings > select SSID > enter new password > SAVE it to apply.
C Update Wavlink AX3000
Download the Wavlink update file for your model from the Wavlink official website that is Wavlink AX3000 Outdoor Extender. Then, access the Wavlink AX3000 login interface and open the Firmware tab. Paste the downloaded file here and click INSTALL button.
Troubleshooting Tips: Wavlink AX3000 Setup
A Wavlink AX3000 not Working
- Check your device is powered on or not. If there is any damage in the wire or cable, replace it straight away.
- Reboot your extender once by pressing the power button twice on the device.
- Reset the device, if it is still not working. You will find the instructions below.
B Wavlink AX3000 Extender Blinking Red
- If you are seeing a red light on your extender, it means the extender is not connecting with the router.
- Try to reconnect the device with the host router via WPS or web-based interface on your computer.
- If everything is working well, then reboot the device once. If it still not resolving the problem reach to our WiFi Wavlink network expert team.
C WiFi Extender Keep Disconnecting
- In case of regular disconnection, you must check the router to extender link first and make sure the extender is powered on.
- Ensure there is no electronic devices are turned on nearby the extender or router.
- Reset the AX3000 device if the issue is not resolved by applying above given tips and solutions.
D Reset AX3000 WiFi Extender
Resetting procedure is so simple and easy. To initiate the reset process, you have to press and hold the pinhole button about 5-8 seconds. It can take several minutes to end the process. But you have to reconfigure the device settings through the web-based interface after resetting the AX3000 outdoor extender.