Wavlink Router Login: A Beginner’s Configuration Guide
Whether you’re setting up a new Wavlink router or configuring an existing one, this guide will walk you through each step, ensuring a smooth and seamless experience. From Wavlink router login to full configuration, we’ve got you covered.
1 Wavlink Router Login: Accessing the Router Interface
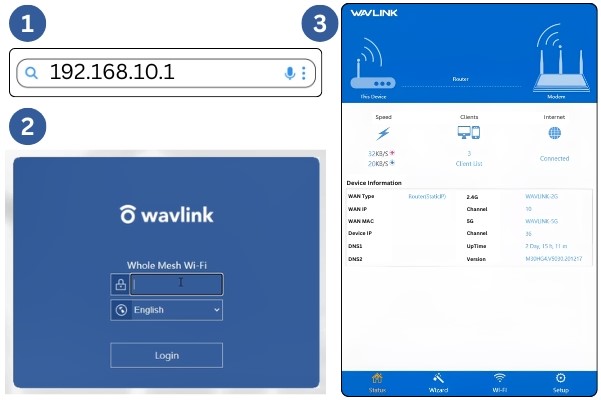
Before configuring your router, first log in to the router’s web interface as it helps you to configure settings that enable you to customize your Wavlink network. Follow these simple steps for easy Wavlink router login:
Step-by-Step Login:
- Connect your device to the Wavlink router either through Wi-Fi or Ethernet cable.
- Open any web browser (Google, Safari or Firefox) etc.
- Enter the IP address (192.168.10.1) or URL (wavlink.com) in URL address bar.
- You’ll be greeted by a dashboard. Enter the default credentials i-e username and password on that page.
Note: Default credentials are mentioned on the back of the router’s label.
- Now you an access the router’s settings interface, after the successful login.

After completing the Wavlink router login process, next step is the router setup.
2 Wavlink Router Setup
After logging into the router’s dashboard, the next step is to Wavlink router setup your network. The following process teaches you to connect the router to the internet, set up the wi-fi and configure other essentials.
Step-by-Step Setup:
- Power on your modem and ensure it’s connected to the internet.
- Connect the WAN port of Wavlink router to your modem’s LAN port using an Ethernet cable.
- Connect PC to the Wavlink router either through its Wi-Fi signal “WAVLINK-XXXX” or using an Ethernet cable.
- Plug in the router to the power socket.
- Long press the router for about 10 seconds to Reset the Router. (when powered on)
- Now, open any web browser (Chrome, Microsoft Edge or Safari) on your device and search for IP Address: 192.168.10.1 or URL: wifi. wavlink. com.
- You’ll reach a dashboard.
- Now, log in with the default credentials: The default Wavlink router login password & username is “admin” unless changed.
- Now, tap on the Wireless Settings section.
- Choose customized name for your network (SSID).
- Reconnect your device to the Wi-Fi network using the new SSID and password.
- Now, the setup is good to go!
- Enjoy the smooth internet connectivity across your home.
Wavlink Router Setup: Advanced Settings for Optimal Performance
After completing the basic Wavlink router setup, you can explore advanced settings to improve performance and customize your network further. Here are some configuration tips:
- Restrict Internet: In the Wireless settings section, you can manually avoid the interference from neighboring routers by selecting the respective Wifi channels.
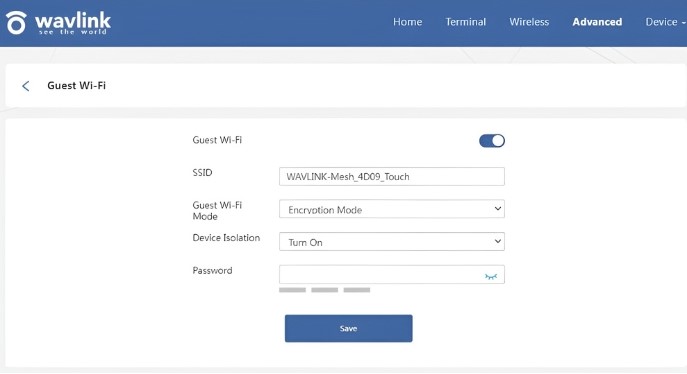
- Set up Guest Network: To ensure the privacy & security of your main network, you can create guest network for any visitors. Tap on Guest Network settings and enable guest network from there. Enter a different password from your main Wavlink router login password to keep it isolated from your main network.

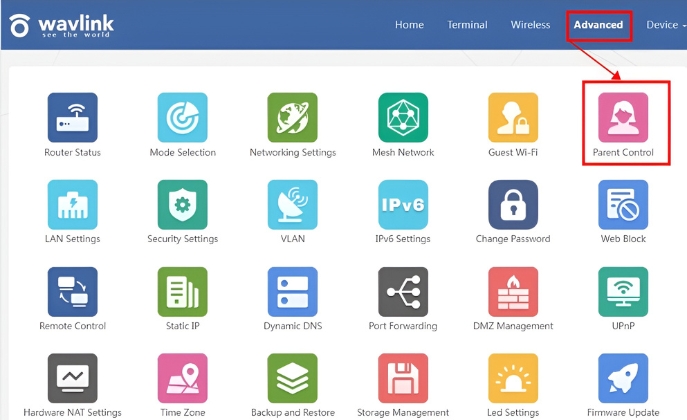
- Parental Controls: With parental control option in the Wavlink routers, you can limit the amount of time your children spend online. It also enables you to restrict specific websites.
You can locate this feature in Security Settings or Parental Controls in the dashboard.

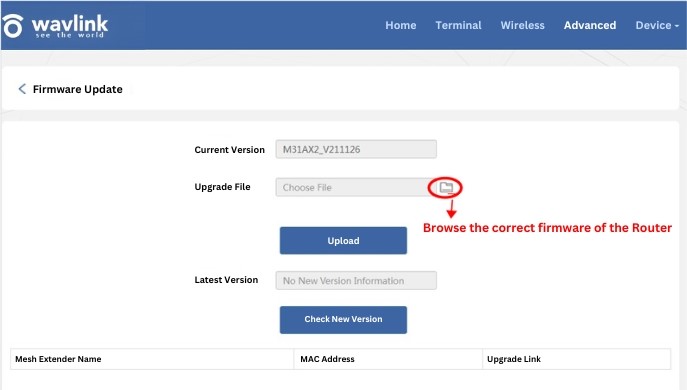
- Firmware Update: Keeping your router’s firmware updated is of utmost importance to ensure the excellent performance & security. Therefore, locate the firmware update section in settings and look for updates, if there are any.

Conclusion
Congratulations! We have successfully completed Wavlink router installation and managed to configure Wavlink router. Your Wavlink router setup is now complete whether it’s a home network or a more sophisticated network, and you’re all set for fast and reliable internet anywhere. In case the problem persists or you need further assistance, feel free to reach out to our customer support team.
Frequently Asked Questions (FAQs)
How to Restore Wavlink Router to Its Default Factory Settings?
Locate the reset button on the back of the router, press and hold it for a few seconds (about 10-15 seconds) until you see the LEDs on the router are flashing.
I Cannot access Wavlink router’s login page What should I do?
Here are the steps to access the Wavlink router log in page:
- Connect your device to the router’s network using Wi-Fi or ethernet cable.
- Type the correct IP (192.168.10.1.) or URL: in the address bar.
- In case of a page not loading, switch to another browser or clear the cache of your current browser.
- If that doesn’t work, reset your router and modem and try again.
Why is my internet slow, even after setting up the Wavlink Router?
There could be a number of reasons for slow internet, try resolving the issue by following these tips:
- Put the router in middle of house, avoiding walls or any obstructions.
- Ensure that electronic devices like microwaves and cordless phones are not interfering with the Wi-Fi signal
- Update the router firmware if it is not already up to date — Open the dashboard and navigate to the firmware update section and update the firmware.
How can I change Wavlink router’s admin password or SSID?
To change Wavlink router’s login password/SSID:
- Open the router dashboard.
- Log In to the router’s settings.
- Update the Network Name (SSID) and Wavlink router login password from the settings.
- Tap “Save” to apply the changes.
What are the steps to configure a guest network for Wavlink Router?
For creating a guest network:
- Login to router’s dashboard and locate guest network settings.
- Activate guest network from there.
- Set a different username and password from your main network to keep the guest network secured.
- It offers a separate internet to your guests while your primary network stays safe & sound
My Wi-Fi signal is weak. How can I improve it?
If the Wi-Fi signal is weak, try the following:
- Move the router to a more central location in your house.
- Keep it away from thick walls or large metal objects to prevent getting the network disrupted.
- Look for interference with nearby Wi-Fi networks. If there are, switch the channel in the Wireless Settings part of the router dashboard.
How do I activate Parental Controls on my Wavlink network?
To turn on Parental Controls:
- Open the router’s dashboard.
- Go to Security Settings or the Parental Controls section
- Set the rules you want.
- Apply the settings to enforce them.
